
 Also available on Hashnode
Docker is a tool that lets you package your app and everything it needs into a container so it runs the same everywhere.
When you’re working with multiple containers—like a web app and a database—they need a way to talk to each other. That’s where Docker networking becomes important.
Setting up container communication safely is also critical, especially when dealing with sensitive data or external connections.
In this blog, you’ll learn how Docker networks work, how to connect containers securely, and best practices for managing communication between them.
What Is Docker Networking?
Docker networking allows containers to communicate with each other, the host machine, and the outside world. It plays a key role in how data flows between services in a containerized application.
By default, when you run a container, Docker connects it to a bridge network, which lets containers on the same host talk to each other using their container names as hostnames.
Docker provides several built-in network drivers, each designed for different use cases:
bridge– The default driver for standalone containers. Great for local communication on a single Docker host.host– Removes the network isolation between the container and the host, letting the container use the host’s network directly.overlay– Enables communication between containers across multiple Docker hosts, often used in Docker Swarm.macvlan– Assigns a MAC address to a container, making it appear as a physical device on the network.none– Disables networking entirely for the container (used for isolation or special cases).
In this blog, we’ll focus on two of the most commonly used drivers: bridge and host. You’ll learn how they work, how to use them, and when to choose one over the other.
Creating and Managing Docker Networks
Docker makes it easy to create and manage networks so your containers can communicate securely and efficiently. Let’s look at how to create a custom network and why it matters.
Creating a Custom Bridge Network
To create a custom network using the bridge driver:
docker network create --driver bridge my_custom_net
Lets break it down:
-
docker network createThis is the main Docker CLI command to create a new network.
-
--driver bridgeSpecifies the type of network driver to use.
The
bridgedriver is Docker’s default for containers on a single host, allowing them to communicate with each other. -
my_custom_netThis is the name you’re giving to your new network. You can use any name you prefer.
Why Use a Custom Network?
By default, containers are attached to Docker’s default bridge network, which is shared and not isolated. This can lead to:
- Less control over which containers can talk to each other.
- Higher risk of unintended exposure.
Custom networks offer:
- Automatic DNS-based container discovery (use container names to connect).
- Better isolation — containers can only talk to others on the same custom network.
- Fine-grained control over communication rules (e.g., using firewall rules).
Inspecting a Docker Network
You can inspect any network to see connected containers, subnet info, and more:
docker network inspect my_custom_net
This returns a JSON output showing:
- Network ID
- Driver type
- Subnet and gateway
- Connected containers and their IP addresses
This helps you debug and verify container connectivity.
Connecting Containers Securely
To allow containers to talk to each other securely and in isolation, you should run them on a custom user-defined Docker network (like my_custom_net). This ensures that only containers on the same network can communicate.
Running Containers with a Custom Network
Here’s how you can attach a container to a custom bridge network:
docker run -d --name app1 --network my_custom_net app_image
This command does the following:
druns the container in detached mode (in the background).--name app1gives your container a friendly name.--network my_custom_netconnects the container to the custom bridge network.app_imageis the image you’re running.
Now, if you start another container on the same network:
docker run -d --name app2 --network my_custom_net app_image
The two containers can securely talk to each other using their names (app1, app2) as hostnames:
# Inside app2, you can ping or connect to:
ping app1
Real-World Use Case
Now that we’ve learned what Docker networking is, how to create a custom network, and how to run containers in it — let’s see it in action with a practical example.
Here’s the real-world scenario we’ll walk through:
- Create a custom Docker network using the
bridgedriver. - Run a MySQL container on this custom network.
- Start an Nginx application container on the same network, binding port
3000:3000. - Launch a monitoring container using the
hostnetwork driver.
Create Custom Network

The command:
docker network create --driver bridge backend-networkcreates a custom Docker network named backend-network using the bridge driver.
-driver bridgetells Docker to use the bridge network type, which is the default for single-host communication.backend-networkis the name you give to the network.- The long string returned is the unique ID of the created network.
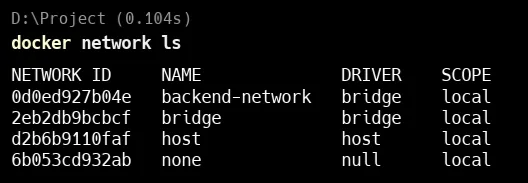
docker network lslists all Docker networks on your system.
In the output, you can see:
backend-networkis the custom network you created using the bridge driver.- Other networks like
bridge,host, andnoneare default Docker networks.
Run MySQL in custom Network
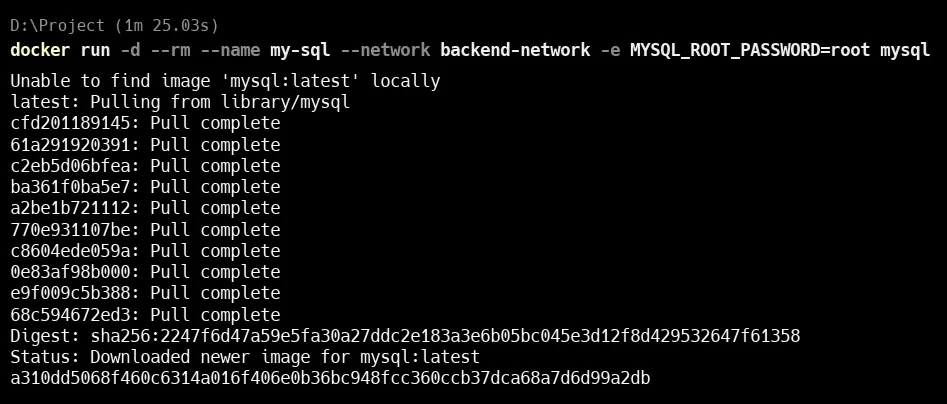
This command runs a MySQL container using Docker with some specific settings:
docker run -d --rm --name my-sql --network backend-network -e MYSQL_ROOT_PASSWORD=root mysqldocker run: Starts a new containerd: Runs the container in the background (detached mode)-rm: Automatically removes the container when it stops-network backend-network: Connects the container to the custom Docker network (backend-network)e MYSQL_ROOT_PASSWORD=root: Sets the root password for MySQL torootmysql: Uses the official MySQL image from Docker Hub

Here we can see that mysql is running in detach mode.
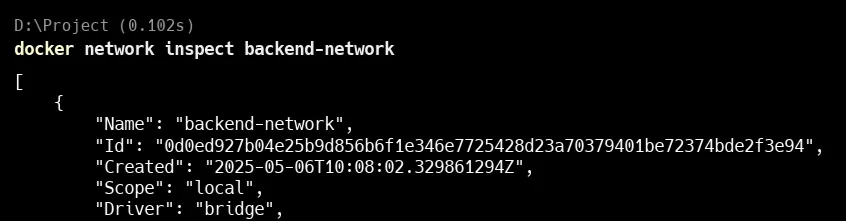
Inspect the network
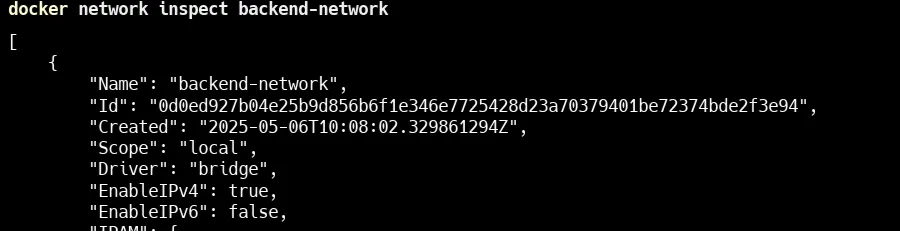
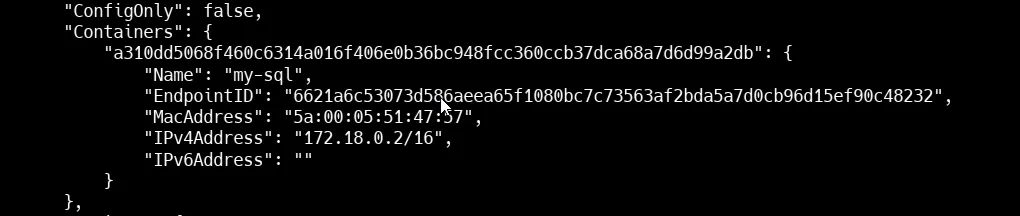
docker network inspect backend-networkHere in the image you can see that mysql is running in custom network backend-network with IP of 172.18.0.2 .
Run Nginx on custom network
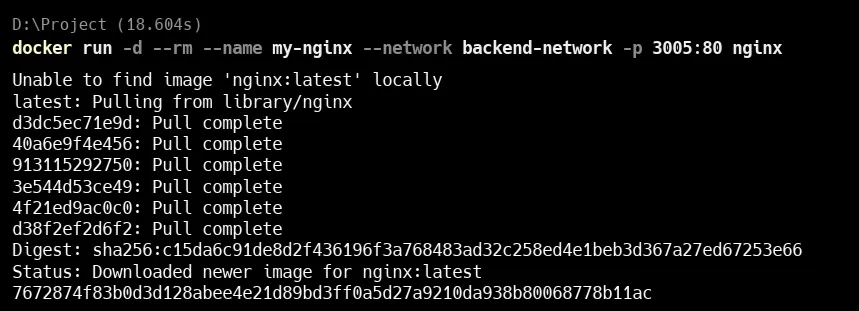
docker run -d --rm --name my-nginx --network backend-network -p 3005:80 nginx
docker run: Starts a new containerd: Runs the container in the background (detached mode)-rm: Automatically removes the container when it stops-name my-node: Names the containermy-node-network backend-network: Connects it to the custom Docker networkbackend-networkp 3005:3000: Maps port 3000 inside the container to port 3005 on your host machinenode: Uses the official Node.js image from Docker Hub

Here you can see that 2 containers are running : my-nginx and my-sql .
Inspect the Network
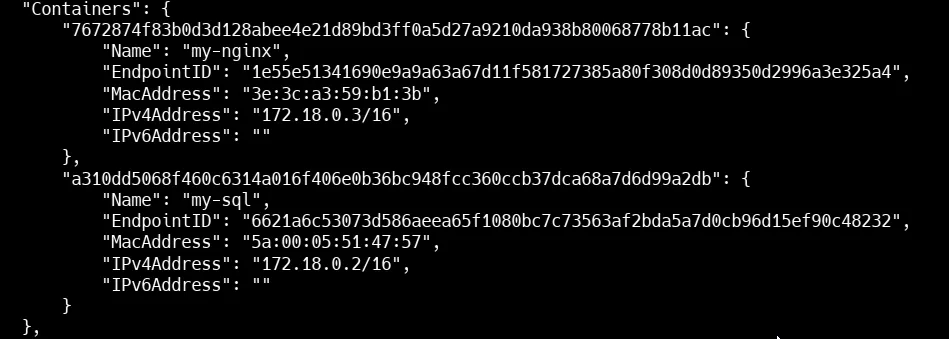
docker network inspect backend-networkHere in the image you can see that container my-nginx and my-sql is running on IP 172.18.0.2 and 172.18.0.3 in custom network backend-network .
Now lets ping to see if we can talk to containers in an internal network
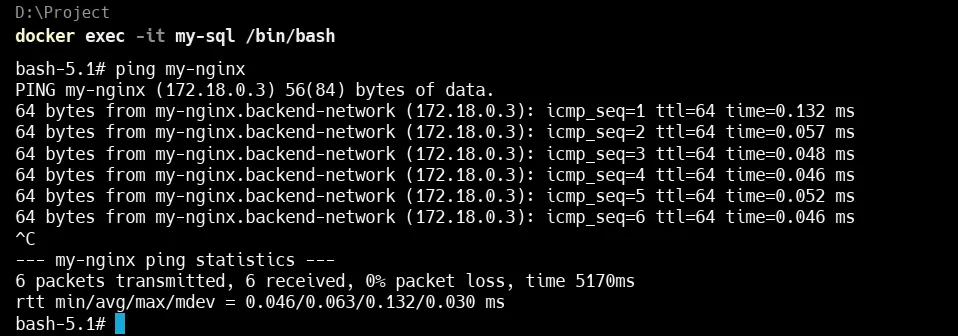
In the above you can clearly see that we can DNS resolve another container within network
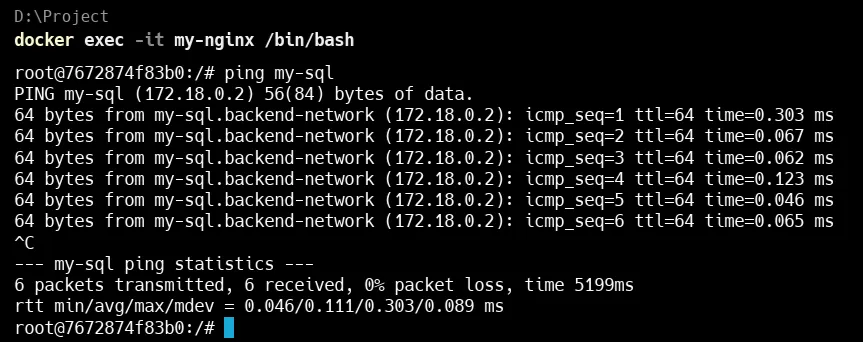
-
We ran:
docker exec -it my-sql /bin/bashThis opened a shell inside the
my-sqlcontainer. -
Then we ping:
ping my-nginxSince both containers are on the same custom bridge network (
backend-network), Docker automatically adds internal DNS, so the namemy-nginxresolves to its container IP (172.18.0.3). -
The ping result shows successful communication between
my-sqlandmy-nginx, with 0% packet loss and very low latency.
Let’s try same from my-nginx to my-sql
Launch a monitoring container using the host network driver
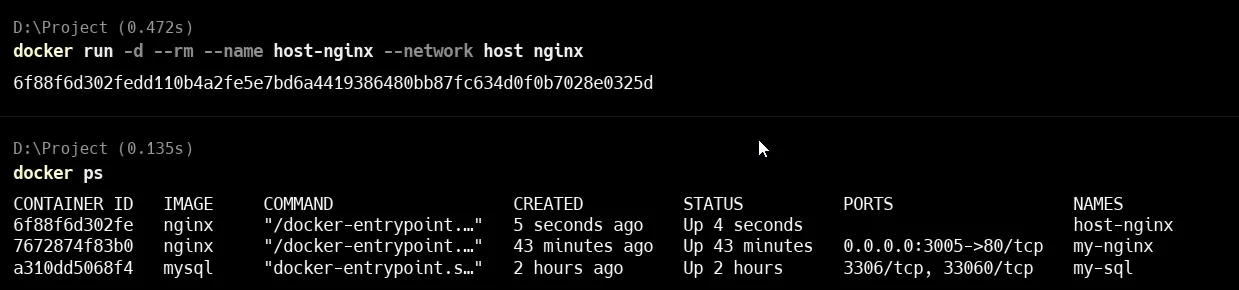
docker run -d --rm --name host-nginx --network host nginxThis command runs an Nginx container named host-nginx using the host’s network.
-name host-nginx: Names the container for easy reference.-network host: Makes the container share the host machine’s network.nginx: Uses the official Nginx image.
Lets Inspect the Host Network
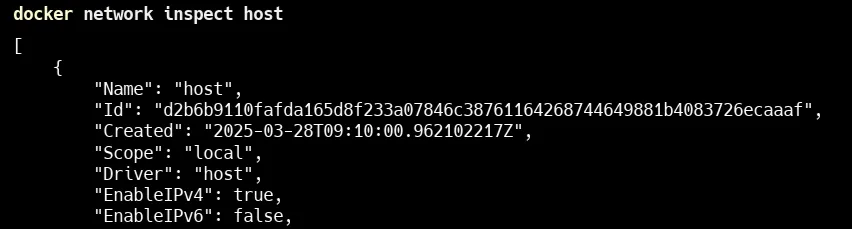
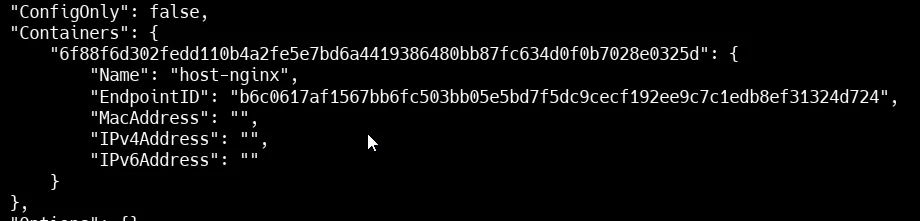
This shows that host-nginx is running on host with no IP as it occupy IP of host.
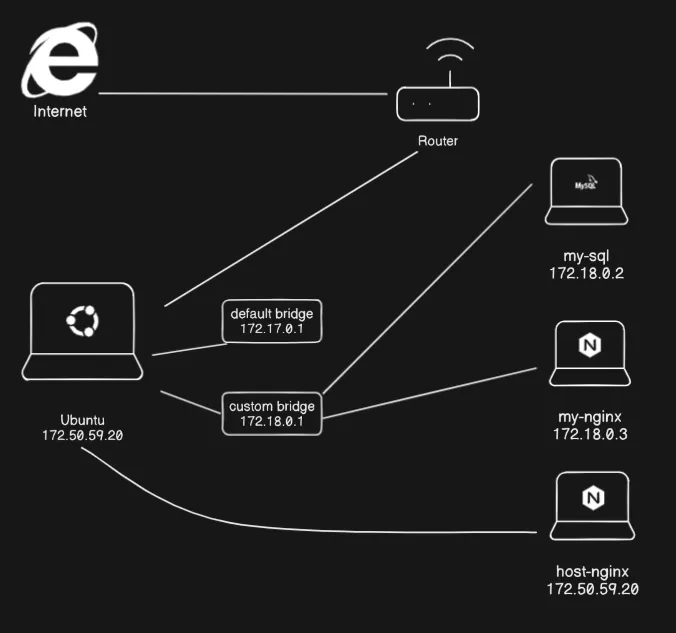
This is what Docker bridge and host network look like
Conclusion
Docker networking makes it easy to connect containers securely and efficiently. By using custom networks and the right network drivers like bridge and host, you can control how your containers communicate and keep your applications more secure. With just a few simple commands, you can build flexible and isolated environments for real-world apps.